Android automation test
Test-Driven Development (TDD) on Android
Test pyramid contains 3 categories of tests: small, medium, and large.
-
Small tests are unit tests that you can run in isolation from production systems. They typically mock every major component and should run quickly on your machine.
-
Medium tests are integration tests that sit in between small tests and large tests. They integrate several components, and they run on emulators or real devices.
-
Large tests are integration and UI tests that run by completing a UI workflow. They ensure that key end-user tasks work as expected on emulators or real devices.
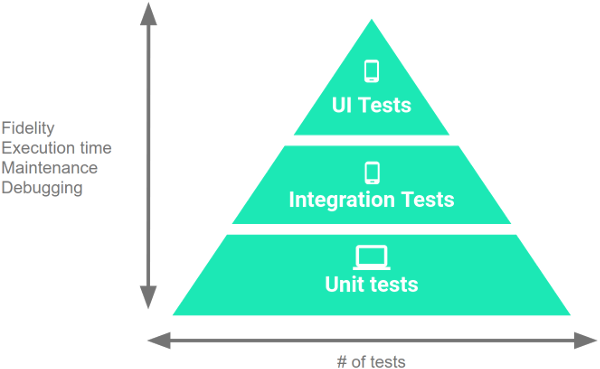
Although small tests are fast and focused, allowing you to address failures quickly, they’re also low-fidelity and self-contained, making it difficult to have confidence that a passing test allows your app to work. You encounter the opposite set of tradeoffs when writing large tests.
Because of the different characteristics of each test category, you should include tests from each layer of the test pyramid. Although the proportion of tests for each category can vary based on your app’s use cases, split among the categories: 70 percent small, 20 percent medium, and 10 percent large is recommended.
TDD Workflow
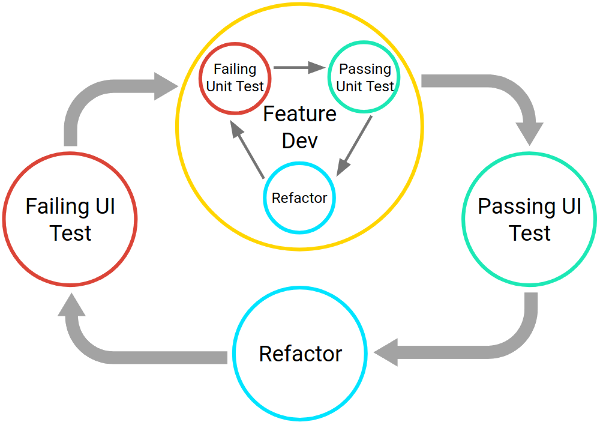
TDD workflow contains a series of nested, iterative cycles where a long, slow, UI-driven cycle tests the integration of code units. You test the units themselves using shorter, faster development cycles. This set of cycles continues until your app satisfies every use case.
Small Tests
Unit test tools
- JUnit
- Mockito
- Spek
For a common MVP-structure Android application.
-
View shows data on UI.
-
Presenter is responsible for the business/presentation logic. Presenters can pick managers what they need.
-
Different Managers handles different functions of the Application.
-
Managers implemented function logic.
We can test following components with unit-test:
Imaginary line rect represents it is a mocked component.
Small tests run fast, but it can only cover pure logic without any Android Context.
Medium Tests
After you’ve tested each unit of your app within your development environment, you should verify that the components behave properly when run on an emulator or device. Medium tests allow you to complete this part of the development process. These tests are particularly important to create and run if some of your app’s components depend on physical hardware.
Medium tests evaluate how your app coordinates multiple units, but they don’t test the full app. Examples of medium tests include service tests, integration tests, and hermetic UI tests that simulate the behavior of external dependencies.
Typically, it’s better to test your app on an emulated device or a cloud-based service like Firebase Test Lab, rather than on a physical device, as you can test multiple combinations of screen sizes and hardware configurations more easily and quickly.
Test components:
We can test PositionManager/DataManager with its real implementation without any mock. So if medium tests pass, we could assume PositionManager/DataManager components works.
Large Tests
Although it’s important to test each layer and feature within your app in isolation, it’s just as important to test common workflows and use cases that involve the complete stack, from the UI through business logic to the data layer.
Unit test tools
- Espresso
- UI Automator
Test components:
With large test (UI Automation Test), we can test whole workflows.
Testing UI for a Single App
You can test 90% your Application functions with Espresso (Single App UI test).
There are 3 simple steps of using Espresso Test:
- Specifying a View Matcher
ViewInteraction username = onView(withId(R.id.ed_username));

ViewInteraction signIn0 = onView(withText("Sign-in"));

ViewInteraction signIn1 = onView(allOf(withId(R.id.button_signin), withText("Sign-in")));

ViewInteraction signIn2 = onView(allOf(withId(R.id.button_signin), not(withText("Sign-out"))));- Performing Actions
username.perform(click(), replaceText("abcd"));- Checking result
onView(withText("abcd")).check(matches(isDisplayed()));You can write test code with Espresso cheat sheet.
Testing UI for Multiple Apps
Although Espresso is powerful and easy to use, it cannot test the scenario: Press home button to make App switch to background, and switch it back from launcher. (If you want to check if data is displayed same as before you switch to background).
Then you can use UIAutomator to cover the shortage of Espresso.
Write a util class to switch App background and then return foreground.
public class UIAutomatorUtils {

    private static final long LAUNCH_TIMEOUT = 3000;

    public static void pressHomeAndRestartAppFromLauncher(Context context, String appName, int backgroundDuration) {
        UiDevice device = UiDevice.getInstance(InstrumentationRegistry.getInstrumentation());
        device.pressHome();

        // Wait for launcher
        final String launcherPackage = device.getLauncherPackageName();
        assertThat(launcherPackage, notNullValue());
        device.wait(Until.hasObject(By.pkg(launcherPackage).depth(0)), LAUNCH_TIMEOUT);

        SystemClock.sleep(backgroundDuration);

        UiObject appsBUtton = device.findObject(new UiSelector().description("Apps"));
        try {
            appsBUtton.click();
        } catch (UiObjectNotFoundException e) {
            e.printStackTrace();
            return;
        }

        // Scroll to app
        UiScrollable appsListView = new UiScrollable(new UiSelector()
                .resourceId("com.android.launcher3:id/apps_list_view")
                .className(RecyclerView.class));
        try {
            appsListView.scrollTextIntoView(appName);
        } catch (UiObjectNotFoundException e) {
            e.printStackTrace();
            return;
        }

        UiObject app = device.findObject(new UiSelector().description(appName));
        try {
            app.click();
        } catch (UiObjectNotFoundException e) {
            e.printStackTrace();
            return;
        }

        // Wait for app
        device.wait(Until.hasObject(By.pkg(BuildConfig.APPLICATION_ID).depth(0)), LAUNCH_TIMEOUT);
    }

    public static void pressHomeAndRestartAppFromLauncher(Context context) {
        pressHomeAndRestartAppFromLauncher(context, context.getString(R.string.app_name), 0);
    }
}
Limitation of Mock server
Automation test usually depends on Mock Server. With mock server, we can easily prepare remote data for different scenarios we need.
Such as:
- Happy path
- Empty data
- Fail request
- Authorization failed
But sometimes mockserver can only give us network data. If you need to communicate with a bluetooth device, tap an NFC card, receive specific location, these kind of data comes from sensors of Android device which cannot provided by Mock Server.
As we can see from the the graph above, RemoteDataSource can be supported by Mock Server, but BluetoothManager and PositionManager still needs to be mocked, without them, we could not finish some testing workflows.
We should mock sensor managers by writing code in App.
First step, import Mockito library into Android app.
debugImplementation 'com.linkedin.dexmaker:dexmaker-mockito:2.12.1'Then we can use Mockito in Android code. Create debug and release folders in app/src dir.
Provide two versions of BluetoothModule:
Release
@Module
public class BluetoothModule {

    @Provides
    @Singleton
    BluetoothHoster provideBluetoothHoster(Context context) {
        return new BluetoothHoster(context);
    }
}
Debug
@Module
public class BluetoothModule {

    @Provides
    @Singleton
    BluetoothHoster provideBluetoothHoster(Context context) {
        if (MockUtils.isMock()) {
            BluetoothHoster mockBluetoothHoster = Mockito.mock(BluetoothHoster.class);
            MockUtils.mockBluetoothHoster(mockBluetoothHoster);
            return mockBluetoothHoster;
        } else {
            return new BluetoothHoster(context);
        }
    }
}
Implement MockUtils:
public class MockUtils {

    public static boolean isMock() {
        return BuildConfig.DEBUG && BuildConfig.FLAVOR.equals("mock");
    }

    public static boolean isAutoTest() {
        try {
            Class.forName("android.support.test.espresso.Espresso");
            return true;
        } catch (ClassNotFoundException e) {
            return false;
        }
    }

    public static void mockBluetoothHoster(BluetoothHoster mockBluetoothHoster) {
        Mockito.when(mockBluetoothHoster.discoverDevices()).thenAnswer(invocation ->
                Observable.just(new BtDevice("11:22:33:44:55:66", "microphone"),
                        new BtDevice("99:88:77:66:55:44", "voicebox"))
                        .delay(500, TimeUnit.MILLISECONDS));
    }
}
Create a new product flavor mock, Then you can use a mocked BluetoothHoster with flavor mock.
Now all front-end workflows can be tested.